- Working with forms {doc}
- form errors{ django }
django.forms를 실제로 활용하고 있는 영상 | https://youtu.be/sMqDJovFO-Y?t=1350
form, 너의 역할은 무엇이냐#
- DRF만으로 데이터 전송할 것이 아니라면 무조건 들춰보게 될 유용한 도구이다. 접속자가 우리 웹에서 활동(글쓰기, 댓글 등)을 하는 여러 유즈케이스를 구현하는데 도움을 줄 것이다.
- 렌더링 이전에는 폼에 필요한 데이터들을 정렬한다.
- 정렬한 데이터를 가지고 HTML
<form>태그 안에 감싸 넣는다. - 사용자 입력을 올바르게 가지고 와서 처리까지 수행한다.
<form>태그에 들어갈 context를 정의하는 객체이다.
Form의 구성#
Media#
form과 연관된 js, css를 정의한다. Form Assets (the Media class) {doc}
Widget#
필드 하나하나를 위젯이라고 부른다. form은 단순히 데이터이다. 템플릿 파일에서 필드를 어떻게 만들지는 순전히 템플릿 작성자의 몫이라는 것이다(물론 백/프론트 분리가 안돼 혼자서 해도 되겠지만). 구체적인 필드에 대한 HTML 코드조각을 백엔드서부터 정의하고자 바로 이 위젯이 나오게 되었다.
예를 들어tinymce는 그저 하나의 위젯을 제공해주는 도구에 불과하다.
ModelForms#
It is possible to write code that does all of this manually, but Django can take care of it all for you.
- django internal class Meta와의 훌륭한 합작으로 커스텀 Model을 폼으로 재창조하는 불편함 없이
field만 매핑하면 내부 작업을 알아서 수행해준다!!! | django.forms.modelforms
from django.forms import ModelForm
 myapp.models import Article

# Create the form class.
class ArticleForm(ModelForm):
     class Meta:
         model = Article
         fields = ["pub_date", "headline", "content", "reporter"]


# Creating a form to add an article.
form = ArticleForm()

# Creating a form to change an existing article.
article = Article.objects.get(pk=1)
form = ArticleForm(instance=article)
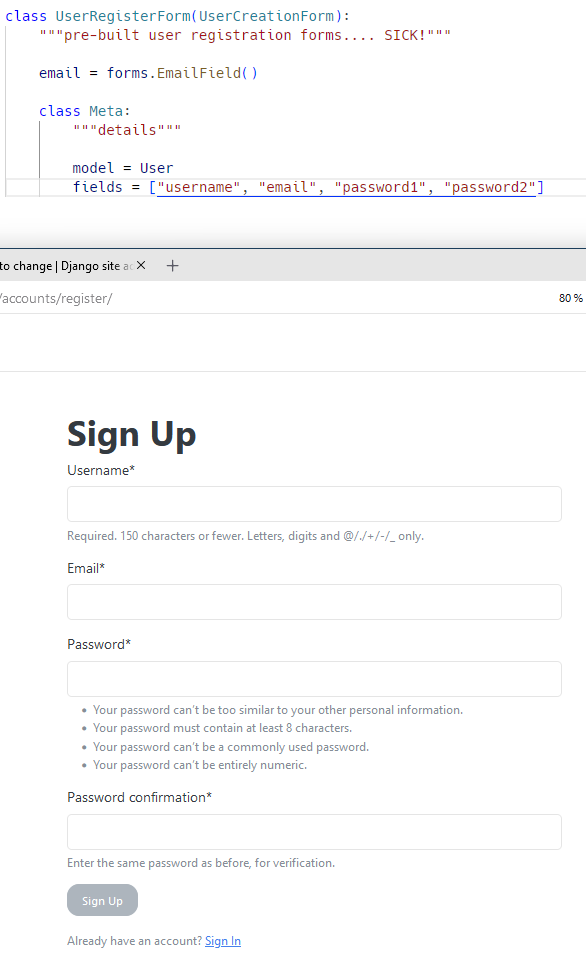
fields의 순서를 바꿨더니 실제 폼의 순서도 바뀌더라~
fields = ["username", "email", "password1", "password2"]
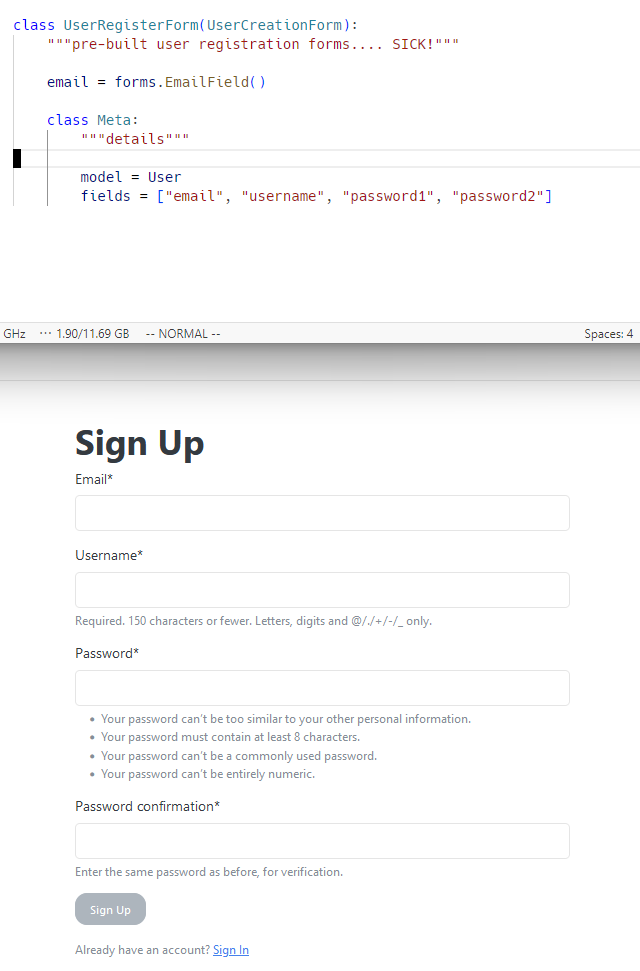
fields = ["email", "username", "password1", "password2"]
UserCreationForm#
forms workflow#
Instantiating, processing, and rendering forms
View에서Form객체를 생성한다.- django template {context} template context에 해당 form을 넘겨준다.
- django template 장고 템플릿 HTML 파일에서 넘겨받은 form을 그대로 붙여넣거나 직접 템플릿 form 요소를 채워넣는다.
템플릿 활용방안 1: 알아서#
<form action="#" method="post">
    {{ form }}
    <input type="submit" value="Submit">
</form>
템플릿 활용방안 2: rendering fields manually#
{{ form.name_of_field }} 를 사용하여 HTML form member를 직접 정의한 뒤에 알맹이만 맡길 수 있다. form errors{ django }에서 에러처리에 대한 인사이트도 얻어가시오.
{{ form.non_field_errors }}
<div class="fieldWrapper">
    {{ form.subject.errors }}
    <label for="{{ form.subject.id_for_label }}">Email subject:</label>
    {{ form.subject }}
</div>
<div class="fieldWrapper">
    {{ form.message.errors }}
    <label for="{{ form.message.id_for_label }}">Your message:</label>
    {{ form.message }}
</div>
<div class="fieldWrapper">
    {{ form.sender.errors }}
    <label for="{{ form.sender.id_for_label }}">Your email address:</label>
    {{ form.sender }}
</div>
<div class="fieldWrapper">
    {{ form.cc_myself.errors }}
    <label for="{{ form.cc_myself.id_for_label }}">CC yourself?</label>
    {{ form.cc_myself }}
</div>
템플릿 활용방안 3: looping over form's fields#
form은 그 자체로 HTML tag를 가지고 있다. 따라서 반복문을 돌아도 해당 태그를 가져다 쓰기만 하면 된다. 예를 들자면
{% for field in form %}
    <div class="fieldWrapper">
        {{ field.errors }}
        {{ field.label_tag }} {{ field }}
        {% if field.help_text %}
        <p class="help">{{ field.help_text|safe }}</p>
        {% endif %}
    </div>
{% endfor %}
crispy-forms#
choices#
CharField {django} {choices}를 장고 기본 form으로 만들면 <select> 태그가 생성된다. 이에 감안하여 choices의 멤버들을 순회하며 아이템을 추가할 수 있다. 가령 다음과 같은 모델이 있다고 하자
class Article(models.Model):
    class Category(models.TextChoices):
        TECH = "TECH", lazy("기술")
        FOOD = 'FOOD', lazy("음식")
        MUSIC = "MUSIC", lazy("음악")
        EMOTIONS = "EMOTIONS", lazy("감정")
        SCIENCE = "SCIENCE", lazy("과학")
        ARTS = "ARTS", lazy("예술")
        ANNOUNCE = "ANNOUNCE", lazy("공지")
        MISC = "MISC", lazy("기타")

    category = models.CharField(max_length=10, choices=Category.choices, default=Category.MISC)
in forms.py
class NewArticleForm(forms.ModelForm):
    """TinyMCE widget"""

    class Meta:
        model = Article
        widgets = {"content": TinyMCE(attrs={"cols": 80, "rows": 30})}
        fields = ["title", "content", "category"]
템플릿 파일에서 category를 제대로 출력하기 위해서는 어떻게 작성해야 할까? 다음 대화 {sof}와 Form.get_context {doc}를 참조해보자. 아래 템플릿 코드가 주어질텐데, 무엇이 정답일까?
-
<select id="category"> {% for key, value in form.fields.category.choices %} <option value="{{ key }}">{{ value }}</option> {% endfor %} </select> -
<select id="category"> {% for key, value in form.category.choices %} <option value="{{ key }}">{{ value }}</option> {% endfor %} </select> -
{{ form.category }}
form.<field_name> 은 그 자체로 HTML tag까지 가지고 있는 완전체라고 했다. 따라서 form.category를 하면 <select>를 포함한 HTML 스니펫이 그대로 들어간다. 따라서 3번은 정답이다.
문제는 2번이다. form.category 뒤에 .을 또 붙여 choices를 참조하려고 한다. 하지만 이미 HTML 문자열 뒤에 choices 멤버가 존재할 리 없다. 따라서 null을 반환하고, 에러없이 빈 채로 렌더링이 된다. 😠
1번도 정답이다. 바로 get_context 메서드 덕분인데, fields라는 이름이 눈에 띈다. 따라서 1번은 form의 HTML이 아닌, 연관된 모델의 필드를 직접 접근하여 반복문 속에서 <option>을 붙여온 것이다.